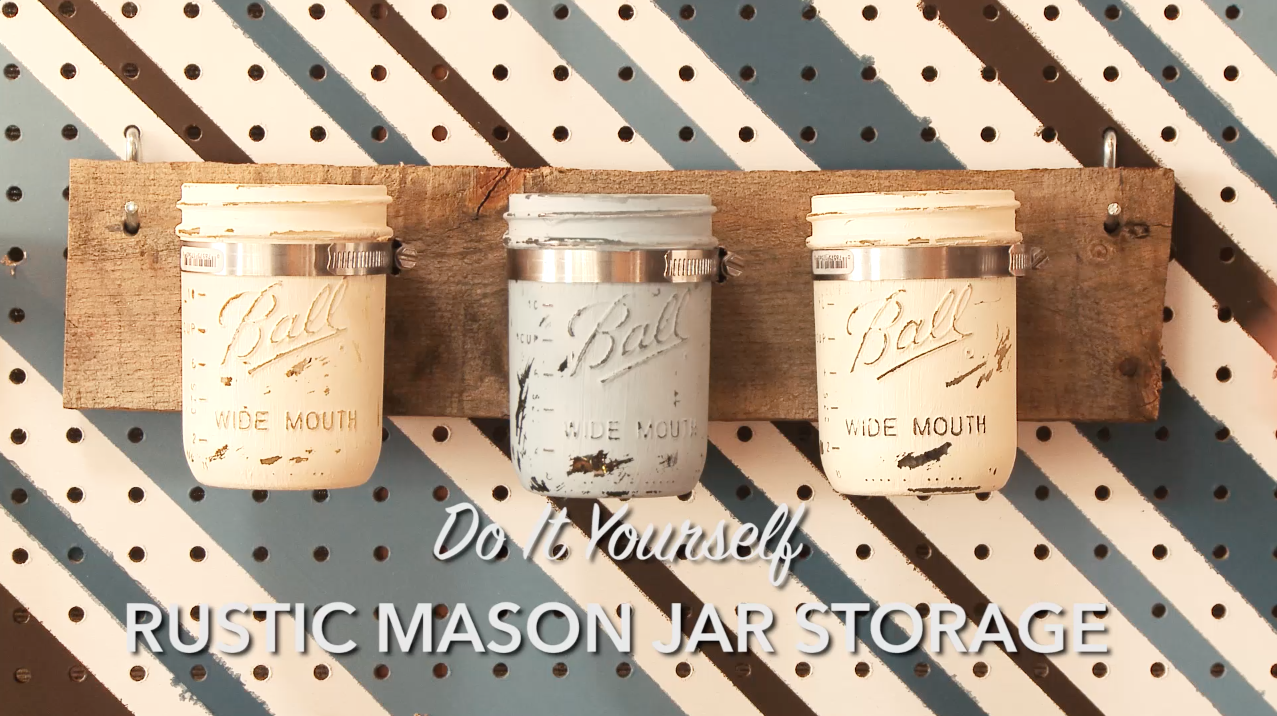

With this simple Mason Jar Organizer, you’ll be storing your stuff in style in no time. Whether you’re looking for a little extra storage on your pegboard or need a stylish way to store the stuff in your home, this organizer provides the perfect rustic touch.
For this project you’ll need:
- Board or Plank
- 3 Hose Clamps
- Mason Jars
- Drill
- Wood Screws
- Permanent Marker
- Chalk Paint
- Sand Paper
- Paint Brush
We began with a panel from a reclaimed pallet. You can use any type of 2×4 board for the project and finish it out with a stain or paint to match your décor. We left the natural wood alone on our panel for the organizer but sanded down some rough areas and knocked out any loose nails.
If you’re using mason jars lying around the house and plan to paint them, it’s best to clean them ahead of time. By cleaning the grease and grime off the outside of the jar your paint will adhere to the glass better. Once the jars are cleaned begin painting. We used chalk paint for its grittier texture.

We applied several coats of paint to our jars to fully cover the surface. After the final layer is dry, it’s time to start using the sandpaper. Use the sandpaper to rough the surface of glass in random sections. There’s no specific formula but we found our jars looked best when we used sandpaper on both the raised and flat areas.

After you’re finished with the sandpaper, measure the mouth of the mason jars and mark out the spacing between them on your board. We left a couple inches in between the jars.

Now it’s time to start drilling! Since the hose clamps can be a bit tough to get through with a wood screw, you can pre-drill a hole through the clamp. Not only will it make it easier to secure to the wood but it will be attached more securely as well. Fit the hose clamp around the mason jar and make a mark on the clamp where you’ll be drilling.

Then pre-drill the hole and attach the hose clamp to the board. At this point you can start to tighten the hose clamps. It’s easier to begin tightening them before putting the mason jars on.

If you’re planning on using the organizer on your pegboard you’ll need to drill holes to attach it to the board. Use a drill bit slightly larger than the hook on your pegboard to drill the holes on your organizer.

Once the holes are drilled and the hose clamps are tightened you can pop in the mason jars. It’s time to get organized!
[av_video src=’https://www.youtube.com/watch?v=tIbYVWNO-wY&feature=youtu.be’ format=’16-9′ width=’16’ height=’9′ custom_class=”]